Friday, February 25, 2011

Centerpiece Tutorial

Hi all,
My latest project is a bird house centerpiece for my monthly CYI group at For Keeps Sake.   The group is a great place to be encouraged in the craft; idea sharing abounds.   

When I start a project, I often feel that it takes me a while to find the end vision.  It's like someone took several glorious puzzles and threw them together in one box.   Which one is the one?  Like my deceased sister-in-law: sometimes I take pieces that didn't belong in the original puzzle and hammer them into place and the original puzzle is changed.

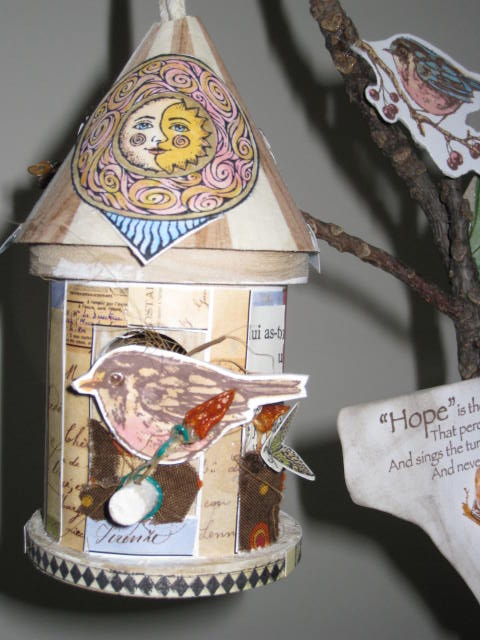
Pictures of the birdhouse project

WORD STAMP
 I'm starting with my favorite picture first (because I can).   I got the Hope stamp at a place called Melange http://www.melangeofstegen.com/ ,the proprietress is an artsy gal who is always willing to share techniques.


BIRD HOUSE
I found a wooden birdhouse and first tried gessoing embossed paper to the cylinder.   Oops, the paper did not hold the emboss (perhaps too thin) and it detracted from the finished product.   So with emphasis, I ripped the paper from the birdhouse.   : >'

I looked through my stash again and found other paper strips, attached them with tape, and ahh it was so much better.


BRANCH AND BASE
Branch: The small branch has been in my studio for some time and was waiting for repurposing.  What better than to again house birds and bird housing.

Base: A spare 2 x 4 scrap was calling out to be the base.

I have many fond memories of my father and power tools so of course I got out the drill and after several different drill bits were used, I found the right size to accommodate the branch into the base.

 The flowers on the base were cut from a Material Girl set and small were layered onto large.   I curled the leaves with my stylus to provide a more 3-D experience.

BIRD and Sun and Moon STAMP
Finding bird stamps in my menagerie wasn't hard, as my daughter's nickname is bird, so I have a plethora of that genre.  I found a little sparrow and a blue bird and decided that they would cohabitate for the day.   Fiction, even in bird land.

The Sun and Moon stamp is for cohesion.


Nature is my muse and birds are very conversant and willing to share.

Gotta go, resume disbursement is calling.
See you soon.
Trish

Tuesday, February 15, 2011

Quilt Piecing Progress

Hi all,  hope you had a great Valentines Day.  

Well I write/call looking for that job, but since that is not progressing at lightening speed, I craft as I wait for the phone to ring with news that I am again gainfully employed.  

I continue to work on my Stack N Whack Fan quilt.   All pieces for the fans are cut and all 32 - 5 piece fans have been sewn together.   This is an example of the fans before they are appliqued/attached to a 10" tan square 

This block  is appliqued at the tips with what I call the chicken-feet stitch. This stitch gives a nice finish and attaches the fan to the block.  Next step is to applique a dusty blue quarter orb at the fan base.


Here are 23 blocks appliqued with all but the blue orb.   23 down, 9 to go.

It is an interesting technique (stack_n_whack) as each fan has the same material but presents a different kaleidescope effect.   Cool stuff.


Have fun all.
Trish : )

Wednesday, February 9, 2011

Heart Paperwork

Good Morning Sunshine,

Yesterday was a good art day for me.   I went to a stamp class in the morning and learned how to use distressed inks, embossing and the negative images of stamps to make an amazing looking watercolored card, it was great.  We tried several images and the G129 Hero Arts large flower stamp was my favorite.


In the evening, I participated in the CYI and Stamp Club at the brick and mortar http://forkeepssakescrapbook.com/(love the people and place).    At CYI we had a one on one heart swap.   Here are pictures of mine:


  • Started with a wooden cutout heart, added some gesso, and randomly stamped small flowers.
  • Cut a paper heart a little larger than wooden heart with deco scissiors and attached to heart back with patterned side forward. 
  • Tore papery birch bark and glued at heart base.
  • Cut short muslin strips and frayed the edges with small clips.   Glued at heart edge starting where bark ended.
  • Glued shimmery red cord in top and bottom flourishes.
  • Cut a flourish for heart stem, and 2 different sized hearts(which I had embossed with twigs and acrylic painted the buds)
  • Finished that feature with a red vintage button, topped with a small polymer clay face (reddened with an ink pad to bring out the facial features).

  • Needed a holding feature for candy, of course.  Hmmmmm, what to do.   Found Pink Paper with a bird that had a flourish for a tail.  Replaced the tail flourish with a fanned tail.
 
  • Scored 2 pieces of pink paper in a V shape with .25" scoring on top of V, coming back to the same point on the bottom.
  • Folded in an accordian fashion and glued where I wanted the birds tail. 
  • Glued one tail piece to bird then other piece to edge of heart.
  • Glued the 2 free accordian edges together, starting at the bottom to create a holding area for the candy. See only a pinhole.
  •  Here's a side view.

Have a great day today.   Remember you are special and treat yourself accordingly.
Trish

Sunday, February 6, 2011

Giveaway Alert: Studio WaterStone Giveaway and Tutorial

Good Morning all,

Giveaway Alert
My friendly dog, Rose (AKA dog that woke me up) and I are sitting here at the computer with a cup of Joe.  As I peruse the blogs, I noticed a very nice tutorial and giveaway by Lori at StudioWaterStone http://waterstonejewelry.blogspot.com/2011/01/necklace-tutorial-and-giveaway.html .    Ahhh,  it woke up my creative self and perhaps now I can go to my studio and start the day. 

Papercraft

Yes, I wrote that I was going to post pictures of my latest quilt but with hubby sleeping, I need to post as quietly as possible and going upstairs will wake him up so perhaps tomorrow. In the meantime, here are a few things that I've been working on.   We had a bottleswap at our CYI monthly gathering at  http://forkeepsake.typepad.com and my bottle was housed in a house made from a shoe box that had great texture that I could ink up and open up.   (I won't be taking any pictures in the dining room again as you can see that the lighting is not up to par. )


Quilt Block

I helped my sister with her parish quilt this year and pieced  6 blocks...example below... for the quilt that she gives annually for the quilt socials to support her church.    I love the on point setting, as it adds interest.    She has other blocks that someone embroidered in the orangish hue so she was excited when she found these fabrics to complement those blocks.  She is a master at setting up the quilts and they still hand quilt them.   They are quite beautiful and it definitely is an art that I cherish.
The quilt was given away and someone is now nestled under it, enjoying the beauty.     

Well, that is it for now.

  Trish

Wednesday, February 2, 2011

February 02, 2011 Groundhog Day

Here is a glimpse of what the last few days have brought us.  The iced screen distorts  the outside images but I didn't think my camera belonged in all the mess outside so here you go.  

I restarted work on an UFO last night.   Imagine that.    My husband says that I like to collect the books and  sewing machines and do the research but as yet he sees no new quilt on our bed.    So, I decided that it was time for me to return to the quilt that I started about a year ago.       

I come from a family of sewers and quilters, and supplemented that knowledge with 4-H and Home Ec.    I have some fond memories of sitting beneath the set up quilt and listening to the women's conversation and of course these gatherings included cake (which was not an everyday occurrence in our household).

 Did Anyone Say Cake........ 


I had a Stack N Whack class at our local quilt shop and that was the start of the quilt top.     It is interesting picking the fabric, as it needs to have a repeating pattern and in this case it repeated every 12 inches.    It is amazing how it makes you look at fabric a whole new way.   

There is a class for the sashing and finishing the quilt top next week perhaps that will provide the focus and  inspiration for me to complete the Stack N Whack Fan blocks this week.   Time will tell.  I'll post some pictures of the WIP tomorrow.


Tuesday, February 1, 2011

February 01, 2011 Winter Wonderwhat

Well, today is my first posting to this blog.   We have had rain, freezing rain, sleet, snow, and as that continues, here comes the wind.    I hope that my trees make it through this ordeal and that we keep our power.

Of course my dog, Rose, has ventured out several times today, in hopes that the neighbor dog, Lucy comes out to play.   


This is a dated picture of her but it shows her general character. 


On a different note:   I'm just about to send my cards for the Vintage Swap at http://creativeswaps.blogspot.com/     I've done several local swaps but this is the first swap I've participated in online, so I'm excited to see the results.     It was a fun process and Lenna provided excellent directives, while still allowing us each to bring our creative persona to the table.


Here are my submissions.  They pale in comparison to others I've seen.


This one is my favorite and the last one I created.


I watercolored inserts for each card.